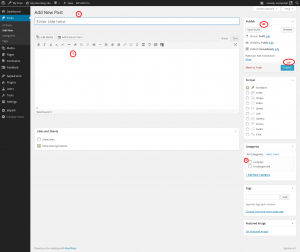
Of course, the whole point of a blog is to say something. This is your voice to world. So how do you do that? This is a quick guide to creating a new post. First, assuming you are logged into your blog site, you need to get to the “Add New Post” page. There are two ways you can get there. If you’re logged in and on the “front-end”, meaning you’re looking at the site displayed as the public sees it, then you’ll have a black admin bar across the top. Towards the left of that black bar there’s a “+ New”. Roll over that “+ New” and sub-menu appears. Click on “Post” and you’ll go to the “Add New Post” page.
If you’re already in the Dashboard or “back-end”, the part the public can’t see, then go to the menu stack on the left side, roll-over or click on “Posts” and then click on “Add New”.
At this point you should see a screen like this. There’s only 4 steps to getting your message out and your writing posted. I’ve labeled these steps in red on this screen shot.
- Type something in as your title. It doesn’t need to be very long and it’s best to stay away from special characters like & or ” or ‘.
- Then move your mouse to the body section. Just type away and let your genius rip. This works pretty much like most word processing programs you’ve used or when you’ve created things in D2L. There’s a toolbar you can use to style things. Right now, just focus on writing. In later instructions, I’ll show you how to add pictures, media, embed videos, and make links to other things on the web.
- When you think you’re finished and want to publish, then you need to go to the lower right (where the number 3 is in screen shot). Be sure to click “compsys” as the category. If don’t click “compsys” as the category, your post will not be picked up and published in the course hub site compsys.econproph.net, which means other students are not likely to see it. Of course if you are publishing something unrelated to this course (which you are welcome to do – it’s your blog), then leave the compsys unchecked.
- Finally, go to click “Publish” button (the 4a circle in screenshot). It takes a moment and then it will tell you it’s published. If you don’t want to publish right now, but you want to save your work, click the “Save Draft”. You can come back later and publish.
That’s it. You’re now a published author on the World Wide Web!

I know what is wrong with my blog but I cannot selected compsys like category because this is not available on the category’s list. Could you help me please
I can select that, and I went through and added “Compsys” for each of my blogs but they all still show as pending…what do I need to do? I have emailed you a few times now and sent you a text with no response.